Tips on How To Remove DRM From iTunes M4V Videos on Mac OS
M4V files purchased from iTunes store are strictly DRM protected. Watching iTunes movies on their Android mobile phones or tablets is limited. Moreover if you want to share rental movies with your friends and families, it is also limited. To get rid off the annoying DRM protection and watch the iTunes movies limitless, you will need a DRM removal tool. Of course, it should be legal at first. Actually, there are lots of such tools in the market, but not all of them can do a flawless work for you. The one I recommend is Noteburner M4V Converter Plus for Mac (for Windows beta), which is a famous brand in this area.
Noteburner M4V Converter Plus for Mac is really a perfect application for mac users who want to remove the DRM protection from iTunes M4V movies, and convert it to other plain formats, like MP4, 3GP, AVI, WMV, MOV,MPEG, FLV, HTML5 formats and so on. Then you can use the movies free without any limitation, watch iTunes movies everywhere, share the movies with others, even upload iTunes movies to the popular websites and more. The most important is that the the Noteburner use is 100% legal.
In this article, we will introduce how to remove DRM protection with Noteburner step by step.
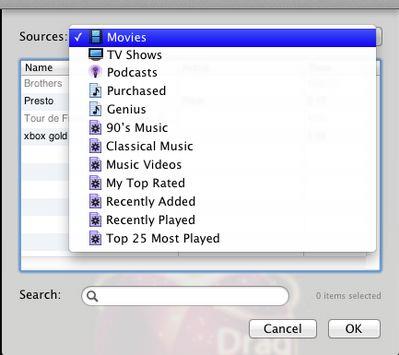
Step 1. Add M4V Movies
Click add button “+”on the top left corner (or on bottom) of the main interface to import the M4V video files you want to convert. The program will open the iTunes movies library by default. Select the files and then click OK.
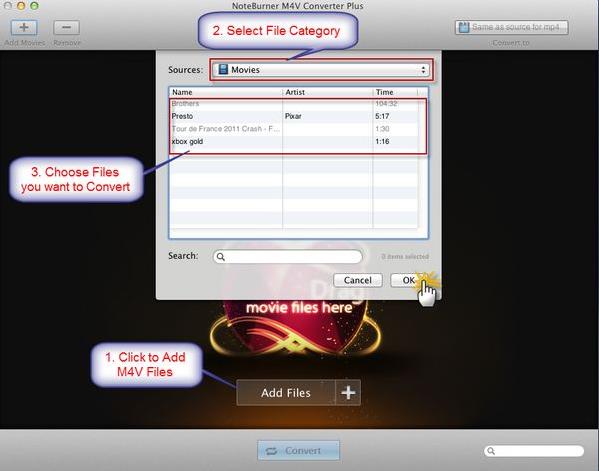
Tips: The program allows you to import files from different iTunes library (Default is Movies).
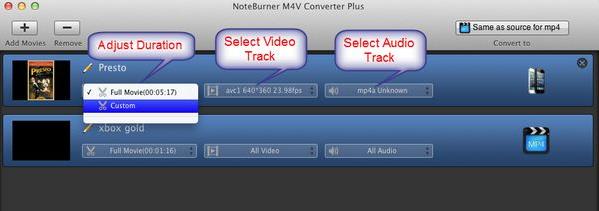
Step 2. Adjust the video duration, choose video and audio track
After successfully importing the M4V resource files to the program, you can directly find the videos displayed on the main interface. You can adjust the duration, select video track and audio track according to your preference.
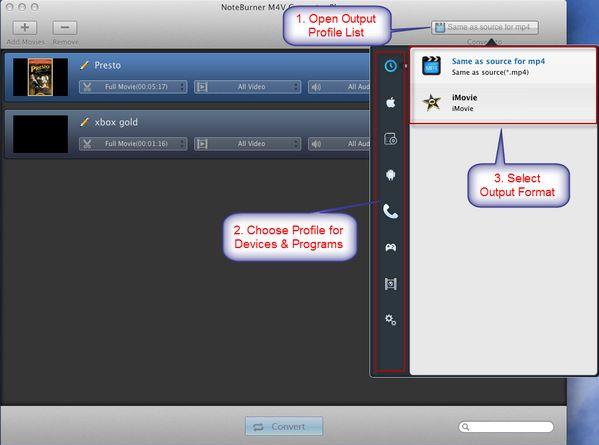
Step 3. Select output format
Click the button above the text “Convert to“, then you can choose the output format from the profile menu. Noteburner M4V Converter Plus for Mac supports multiple formats well including MOV, MP4, iPod, iPhone formats as output.
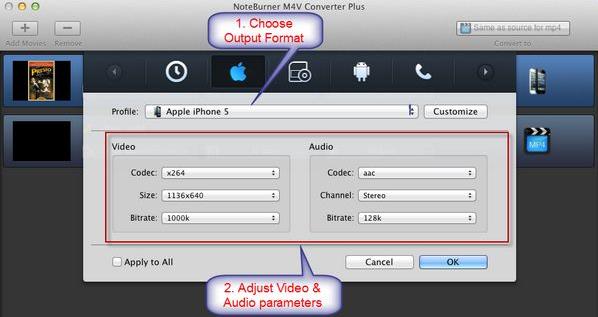
Step 4. Adjust profile settings
Click the icon on the right side of the video tab, you are allowed to adjust the parameters of the video and audio settings. You can change the video codec, video size, video bitrate and other parameters by yourself.
Step 5. Set output path and start converting M4V videos
You need to click the button “Convert“on the bottom of the main interface and you will come into a new converting window. You can set the output path for your converted videos and then freely click the “Start” button to start converting M4V videos.